Article: DIY: Make Your Own Vintage Quilted Jacket
DIY: Make Your Own Vintage Quilted Jacket

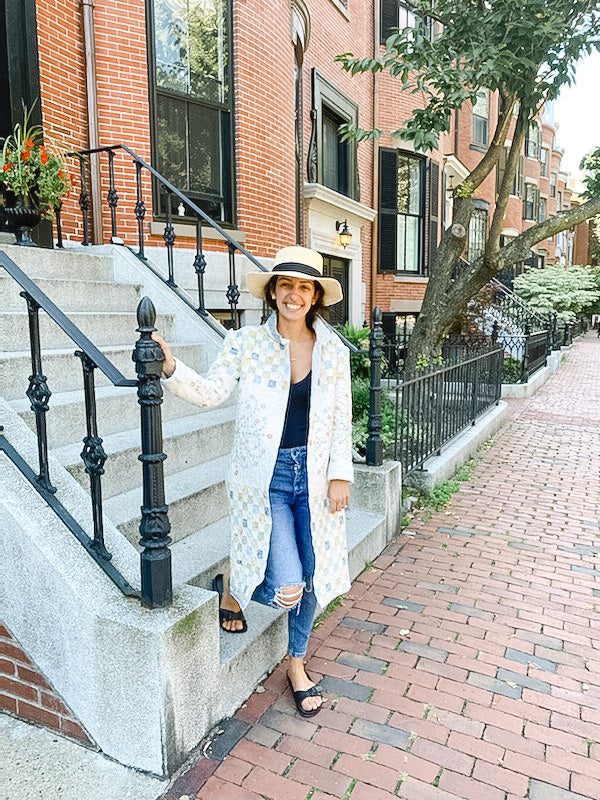
Everywhere I look, I keep seeing images of patchwork quilted jackets. I’m pretty sure I had one of these in 9th grade…but since it’s now long gone it must be time to make a new one! I’m no expert, but I do like to copy things that I see IRL.

Did I use a pattern?? No!! Just a Target jacket who's oversized fit I enjoy. If you like playing with fabric to get the perfect fit...then this one's for you! If you're a pattern person (which I love and respect), then I'd probably sit this one out.
So here we go!
Materials:
You’ll need:
- 1 premade quilt
- 1 jacket (to use as template)
- Thread
- Erasable Marker
- 1/2 in basting (if you want!)
- Pins
- Scissors
- Sewing machine
- Serger (optional)
The Quilt
As luck would have it, I found these old quilts at my parents home! However, any yard sale/thrift store/ goodwill should have some available. Or, try Etsy or eBay! And the best part? You’re giving life to an already used fabric. Love that vintage sustainable lifestyle!

The Pattern (aka a fav jacket that you own!)
Personally, I'm not much of a pattern person. I enjoy playing with fabric and seeing what works! But, if you'd like to use a pattern, I'm SURE you can find a few good ones.
Find a jacket at home who’s fitting you like. Ideally, it’ll have a bit of a looser fit, which will better compliment the heaviness of the quilt. Then, do a quick spot check…i.e. lay the jacket onto the quilt and make sure that you’ll have enough material to make your desired jacket. You’ll most likely have 5 pieces….1 back, 2 front, and 2 sleeves. I also cut out a piece for a collar. Once you’ve double checked, you should be ready to cut!

The Process
Place the quilt flat out on the ground or table and get a sense of the quilt's design. The back of your jacket will take up the largest amount of quilt, so try to visualize what you’d like to be the focal point to be. Next, look for two matching sections from which to cut out the two front pieces of your jacket. You’ll ideally want these to be symmetrical, so keep that in mind too!

I first cut out the left front piece. Lay the jacket's left side down, and trace onto the quilt. Add about 1 in to each sides, giving you room for a seam allowance. (Remember to add a 1 inch seam allowance for each piece.)
 (The Love Bug Himself! Very Curious...)
Next, I repeated the process with the back piece, taking special care to find a fun full design for the back.
Then, I traced one of the sleeves on a folded section of the quilt. Once I cut out the first sleeve, I repeated the step for the other sleeve. Again, make sure both sleeves designs are symmetrical (if you want them to be! No judgement if you’re doing your own thing !) Below is an example of how you could lay out your sleeves.
 (Sleeves on folded edge)
Lastly, take the pre-cut left front piece, flip it (so the pattern faces down) and trace it onto the quilt. Again….double check to make sure that patterns and seams line up. Mine almost didn’t so I had to change course a bit.
I actually have an identical quilt to the one I used for this pattern, so here's an aerial view of how I laid out all of the pieces (asides from the collar).
 (Left Front Side, Two Sleeves, Back Panel, Right Front Side)
Sewing It All Together
Now you have all your pieces! Lay them out, to get a sense of what comes next. As you can see, my edges are NOT perfectly straight. For me, that's okay! It'll all get taken care of later.

I first like to sew the shoulders together. So, pin the pieces in place, right sides together and sew (or serge!) But if you serge…make sure you change the setting on your serger! (Someone broke her serger in the process...eye roll )
 (Pinned Shoulders)
After that, pin the right sides together of the sleeves and pin along the jacket's sides. Then, try the jacket on and see how it fits ! Put it on and do a twirl.
I ended up taking off one inch from each sleeve and maybe an inch from each side. But it’s all up to you! I also pinned my collar into place to see how that would fit.

(Pinned Sides)

(Pinned Sleeves)
 (Pinned Collar)
Once you feel good about the fit, serge or sew each individual sleeves and both sides of the jacket. Then, sew rights sides together for the collar. Not too hard right?!
Look at that! You basically have a competed jacket!
Now for the raw edges. Because I LOVE to serge, I’ll go and serge all exposed raw edges. Then, you can choose to take the bias tape and pin it to the now serged edges. Go and top stitch the bias tape in place. While I opted for no bias tape, feel free to go all out! Use a fun color! Use a patterned one!
And voila! Done ! Not so bad right?!
Here’s my philosophy. Have fun with it! Don’t stress over the straightest lines or stiches ! It’ll look awesome! And at worst you can always buy some more fabric :)


Leave a comment
This site is protected by hCaptcha and the hCaptcha Privacy Policy and Terms of Service apply.